

Optimizing your Shopware store for search engines is crucial for attracting U.S. customers and growing your online business. Fortunately, the latest version of Shopware comes with powerful built in SEO tools that allow you to improve your store’s visibility without any plugins. In this comprehensive guide, our solution25 experts walk you through each step to configure and fine-tune your Shopware SEO settings. We’ll cover everything from meta titles and descriptions to SEO-friendly URLs, image alt text, structured content, and sitemap/indexing basics. By following these steps, even newcomers to Shopware can achieve a solid SEO foundation and set their store up for higher rankings on Google and other search engines.
Free 15 min initial consultation directly with our experts.
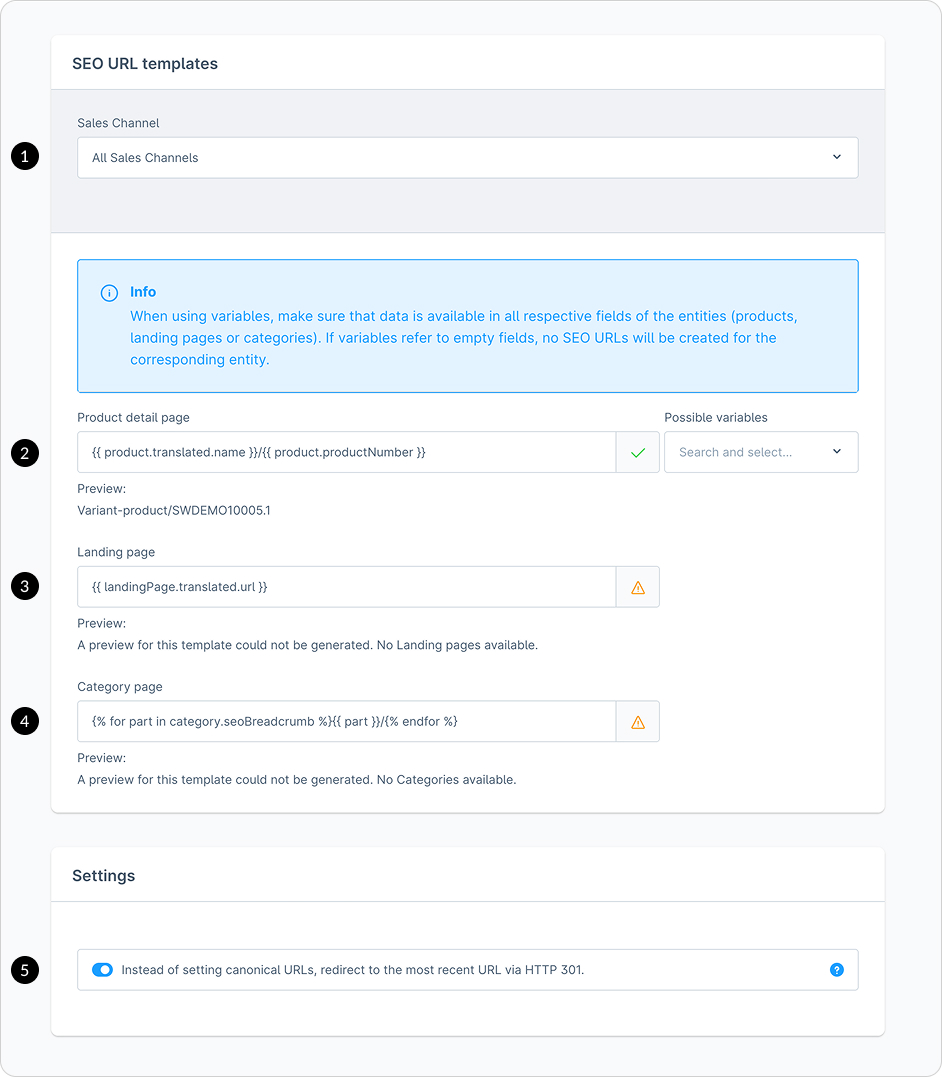
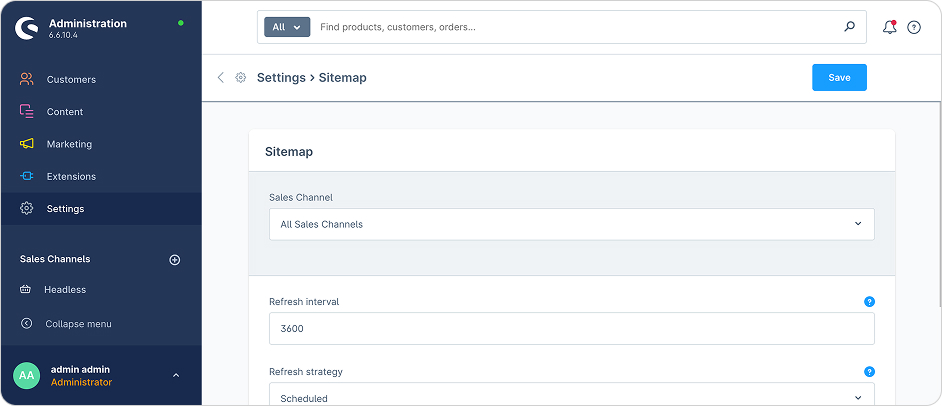
With the item Sales channel (1) you can determine whether you want to configure the configuration globally for all sales channels or only for a selected sales channel.
If you have selected a specific sales channel and want to go back to the general setting, just click into the selection field and delete the content. Afterwards “All sales channels” will be displayed again.
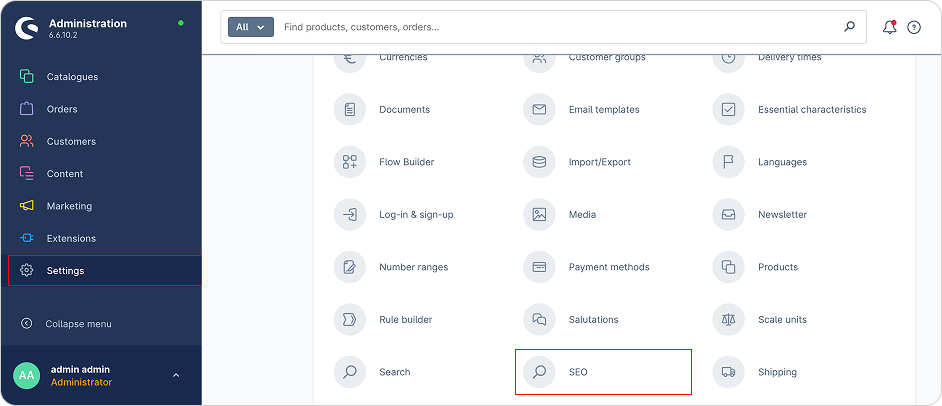
You can find the SEO settings under the settings.

Meta titles and descriptions are the snippets that appear in search engine results, and they play a major role in convincing users to click through to your site. In Shopware, you can easily set unique meta titles and descriptions for each page (products, categories, and even the homepage) using built in fields. Follow these steps to configure them:
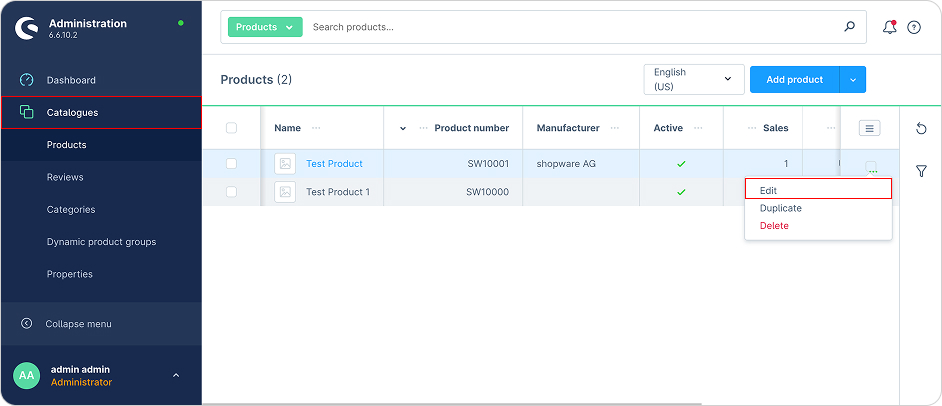
Navigate to Products: Log in to your Shopware administration panel and go to Catalogues > Products.
Edit a Product: Click on the product you want to optimize (or use the “Edit” action). This will open the product detail editor.
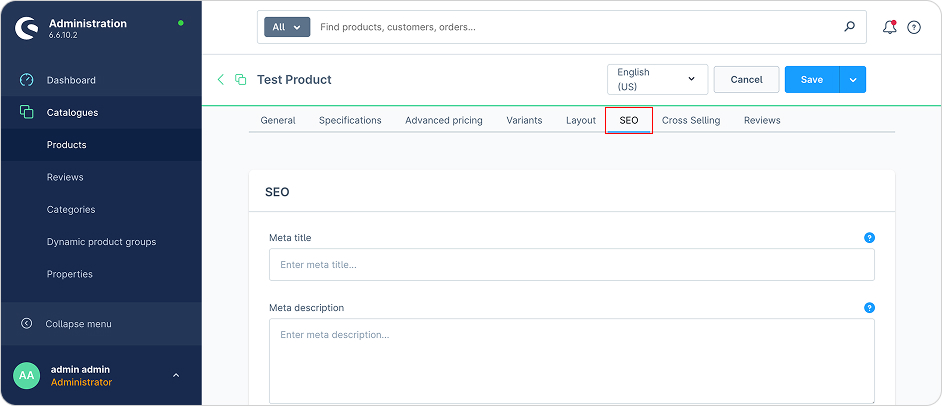
Open the SEO Tab: In the product editor, find and select the “SEO” tab. Here you’ll see fields for Meta title and Meta description (and possibly Keywords).
Enter a Meta Title: In the Meta title field, type a concise, descriptive title for the product page. Include the product name and a key detail or USP if possible. For example: “Leather Ankle Boots Stylish Brown Men’s Boots”. Aim for around 50–60 characters so it doesn’t get cut off in search results.
Optional – Keywords Field: If a Keywords field is present, you may enter a few relevant keywords. Note that modern search engines (Google) ignore the meta keywords tag, so this is optional and mainly for your own reference or legacy purposes.
Save Changes: Click Save to apply the meta tags to the product. Once saved, Shopware will use your custom title and description for that product’s page.
Tip: Do this for all important products. Unique meta titles and descriptions help avoid duplicates and improve your click-through rate by showing a more compelling snippet to shoppers.
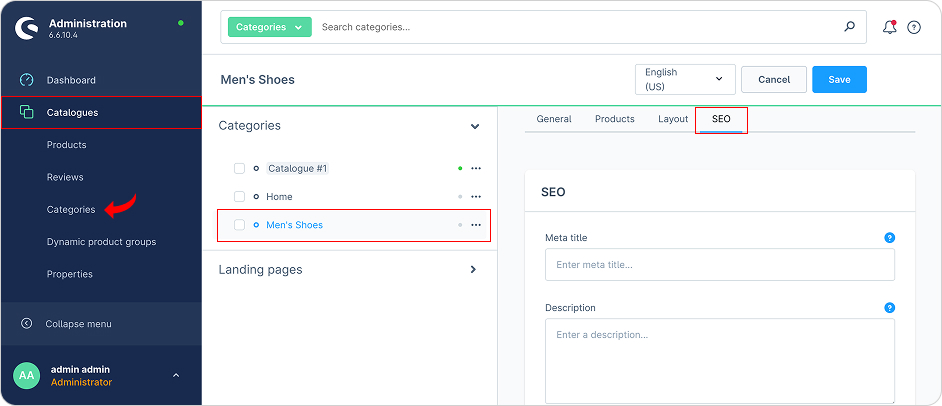
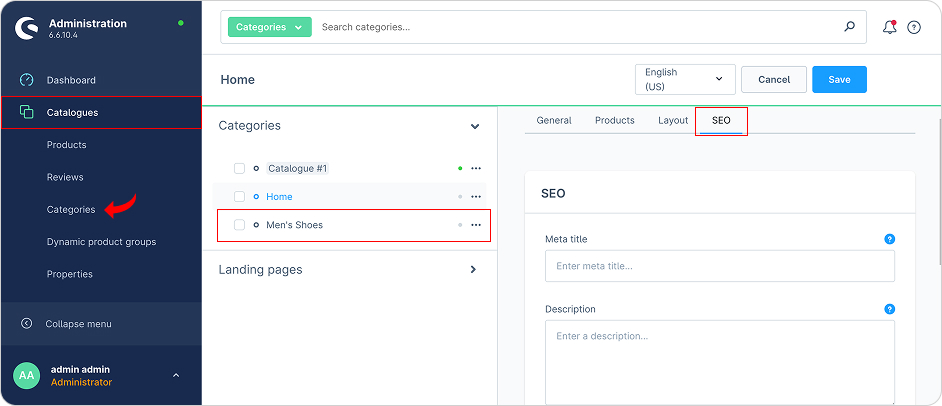
Navigate to Categories: In the admin menu, go to Catalogues > Categories. Here you’ll see your category tree (e.g., main catalog and sub-categories).
Select a Category: Click on the category you want to optimize (for example, “Men’s Shoes” or any main product category). The category detail settings will appear on the right.
Open the SEO Tab: Click the “SEO” tab in the category settings. You should see fields for Meta title, Description, and Keywords (similar to the product SEO tab).
Enter a Meta Title: Provide a descriptive title for the category page in the Meta title field. This could simply be the category name plus a qualifier. For example: “Men’s Shoes Formal & Casual Footwear”. If it makes sense, include your store name or a tagline, but keep it within 50–60 characters.
Enter a Meta Description: In the Description field, write a summary of what products or content the category contains. Highlight the range of products and any unique selling points (like free shipping, top brands, etc.). For example: “Browse our collection of men’s shoes including sneakers, boots, and dress shoes. Find top brands and styles for every occasion, with free shipping on orders over $50.” Keep it around 150 characters and make it enticing.
Keywords (Optional): You can add a few keywords in the Keywords field if you wish, but as mentioned, this tag isn’t used by Google. Prioritize the title and description for SEO impact.
Save: Click Save to apply the changes to that category page.
Make sure every important category on your site has a custom meta title and description. This not only improves SEO but also helps users see a relevant snippet when your category pages appear in search results.
Find the Home Category: In Shopware, your storefront’s homepage is managed via the categories as well. Typically, the top-level category of your main catalog (often named “Home” or similar) represents the homepage. In Catalogues > Categories, click on the main root category (e.g., it might be labeled “Home” or “Catalogue #1” depending on your setup).
Open SEO Settings: With that root/home category selected, go to the SEO tab on the right side.
Set a Meta Title: Enter a meta title for your homepage. This should ideally include your store name and a brief value proposition or slogan. For example: “Smith’s Shoes Quality Footwear Online”. This will be the title for your site’s main page on Google, so make it brand-focused and around 50–60 characters.
Set a Meta Description: Write a welcoming meta description that describes your overall business and offerings. For instance: “Smith’s Shoes offers a wide selection of quality footwear for men and women. Shop online for boots, sneakers, and dress shoes with fast US shipping and easy returns.” Aim for ~155 characters and include a couple of important keywords (like “footwear” or “shoes”).
Save: Save the SEO settings. Now your homepage will have a custom title and description that better represent your brand and help attract clicks from searchers who find your homepage.
Note: If you do not set meta tags for a page, search engines will automatically pull content from the page (e.g., product name or part of the description) to create a snippet. This is not always optimal, so it’s best practice to fill these fields for maximum control. By crafting unique meta titles and descriptions across your Shopware site, you’ll improve your store’s relevance and click-through rates in search results.
SEO friendly URLs are URLs that are easy for both humans and search engines to read and understand. In Shopware, your product and category URLs are by default generated to be pretty and descriptive (usually based on the item’s name). For example, a product called “Leather Ankle Boots” might automatically get a URL like /leather-ankle-boots instead of a random ID or query string. Here’s how to configure and optimize your URLs in Shopware:

Check Default URL Settings: Go to Settings > Shop > SEO in the Shopware administration. In this SEO settings screen, you’ll find SEO URL Templates for different entity types (Product detail page, Category page, etc.). By default, Shopware provides a template like {{ product.name }} for product URLs and {{ category.name }} for category URLs, which uses the item’s name as the URL slug. This is a good starting point for most stores because it keeps URLs relevant.
Customize URL Patterns (Optional): If needed, you can adjust these templates. For example, you might include a category path in product URLs (like {{ category.seoBreadcrumb }} to include the category hierarchy) or add other elements. For beginners, it’s usually best to stick with the simple product-name and category-name URLs unless you have a specific SEO strategy requiring changes.
Save and Generate New URLs: After making changes to URL templates, click Save. Shopware will start using the new format for any *new* URLs generated. For existing products/categories, you may need to regenerate the SEO URLs so everything updates. To do this, head over to Settings > System > Caches & Indexes. From there, clear and warm up the cache or specifically refresh the SEO index (Shopware’s term for rebuilding SEO-friendly URLs). This process will generate the updated URLs site-wide. (Be patient, if you have a lot of products it might take a little time.)
Verify the Frontend URLs: After regeneration, navigate your storefront and click on a product or category to see the URL in the browser. It should reflect the pattern you set (for example, yourstore.com/leather-ankle-boots for the boots product). Clean URLs like this are both user friendly and give search engines contextual keywords about the page.
Enable 301 Redirects for URL Changes: It’s common in SEO that URLs might change (for instance, if you rename a product or modify a category name). To preserve your SEO ranking and avoid broken links, Shopware has a built-in option to automatically create a 301 redirect from the old URL to the new URL whenever a change occurs. In the Settings > Shop > SEO screen, look for the “Forwarding” or redirect behavior setting and ensure it’s enabled. With this on, Shopware will seamlessly redirect visitors and search engine bots to the updated URL if, say, “leather ankle boots” changes to “brown-leather boots”. This means you won’t lose any “link juice” or traffic due to URL changes.
Canonical URLs: Shopware also helps manage duplicate content by using canonical URLs. If a product is accessible via multiple paths (for example, if it’s listed in multiple categories), Shopware will assign a canonical URL (the primary URL that search engines should index). This is usually handled automatically. Just be aware that the platform is looking out for you in terms of duplicate content. You can usually see or set a canonical link in the SEO tab of a product if needed, but unless you have a special case, the defaults are fine.
By ensuring your URLs are clean and descriptive, you make it easier for search engines to understand your site structure. Users also appreciate readable URLs because they instill trust and are easier to remember. For example, /mens-shoes/boots/leather-ankle-boots is far preferable to /category?id=123&product=456. Take advantage of Shopware’s SEO-friendly URL settings to put your best foot forward in search results.
Images are an important part of any online store they showcase your products. But search engines can’t “see” images the way humans do, so it’s essential to provide alternative text (alt text) for each image. Alt text not only helps with accessibility (visually impaired users using screen readers will hear the alt text describing the image), but it also gives search engine crawlers context about the image content, which can improve your SEO (and even help your images appear in Google Image search). Here’s how to optimize images in your Shopware store:
Go to the Media Library: In the Shopware admin, navigate to Content > Media. This will open the Media Manager, where all your uploaded images and media files are listed.
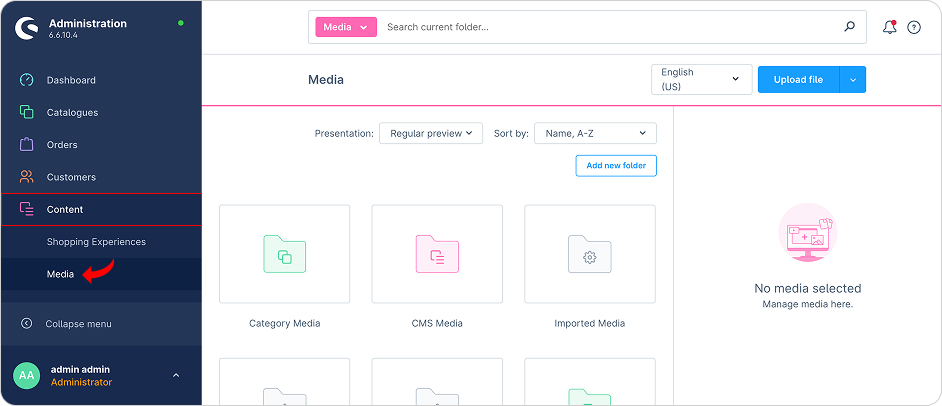
Select an Image: Browse or search for a product image (or any image) you want to add alt text to. Click on that image in the media library to view its details. On the right side, you’ll see the media file’s information and settings.
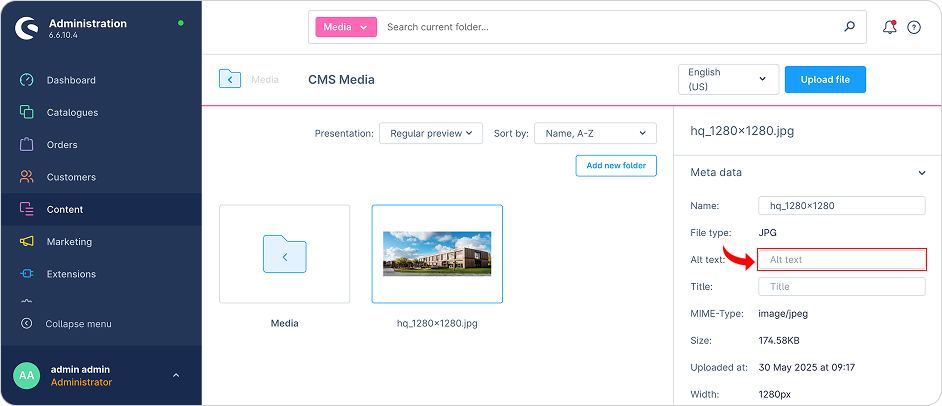
Edit Metadata: In the media details panel, look for the Meta data section. Here, Shopware allows you to set the Name (filename/title), the Alt text, and a Meta-title for the image.
Set an Alt Text: In the Alt text field, enter a descriptive text for the image. The alt text should accurately describe what the image is or its purpose. For example, if the image is a product photo of brown leather ankle boots, your alt text could be: “Brown leather ankle boots with laces”. Be specific and include keywords if they naturally fit (e.g., the product name or category), but avoid “keyword stuffing.” The text should read naturally and describe the image as if you were telling someone who cannot see it.
Update the Name (if needed): It’s also a good practice to have a clean, relevant filename for your images. In the Name field (which might reflect the filename), you can use a descriptive name (e.g., brown-leather-ankle-boots.jpg instead of IMG_1234.jpg). If you didn’t do this before uploading, you can change it here. While the direct SEO impact of filenames is minor compared to alt text, it can still contribute slightly and keeps your media library organized.
Save Metadata: After entering the alt text (and adjusting name/title if desired), save or update the media item’s info. The new alt text will now be used in the storefront HTML for that image.
Repeat for All Key Images: Go through your product images, banners, and any other important visuals, and make sure they all have meaningful alt texts. Focus on product images first (since those are most crucial for SEO and accessibility). For product galleries, ideally each image’s alt text can describe the angle or variant shown (e.g., “brown leather ankle boots, side view”). Consistently doing this improves your site’s overall SEO health.
By optimizing alt texts, you not only improve accessibility compliance but also give search engines more information about your content. This can slightly boost your page relevance for certain keywords (for example, an alt text with “brown leather boots” can reinforce that keyword on the page). Additionally, your images become eligible to appear in image search results, which can drive extra traffic. Always strike a balance: describe the image in plain language and incorporate a keyword if it makes sense. This way, your Shopware store’s images will be an asset for both users and SEO.
Bonus Tip: Large, unoptimized images can slow down your page loading speed, which is a ranking factor for SEO and affects user experience. Make sure to compress or resize images appropriately before or during upload. Shopware’s media manager can generate thumbnails and different sizes; use these features to ensure you’re not loading huge images where a smaller one will do. Faster pages mean search engines can crawl your site more efficiently and users won’t get frustrated by slow pages.
Aside from meta tags and URLs, good SEO also comes from how you structure the content on your pages. “Structured content” in this context means organizing your page content in a logical, hierarchical way (using headings, subheadings, lists, etc.) and ensuring the information is presented clearly. It also touches on using structured data (schema markup) to help search engines interpret your content for rich results. Let’s break down the best practices for on-page content structure in Shopware:
In summary, focus on creating rich, well-organized content on your Shopware site. By structuring your pages with clear headings and providing valuable information, you cater to both your shoppers and the search engines. Google’s algorithms are very good at figuring out what pages are about, especially when you present content in a logical way. And remember, content is king in SEO great product descriptions, helpful category intro texts, and a blog or guides (if you have the resources to add a blog via Shopware or an integration) can all boost your visibility. As an American store owner, consider what your customers might search for (their questions, the phrases they use) and incorporate those naturally into your on-page content. This way, your site becomes relevant not just for product names, but also for broader search queries, improving your chances of ranking and attracting organic traffic.
Even with all the on page optimization, we need to make sure search engines can easily find and index all your Shopware store pages. This is where an XML sitemap and proper indexing settings come into play. Shopware provides built in tools for generating a sitemap and ensures your site can be crawled efficiently. Here’s how to set up your sitemap and cover the basics of indexing:
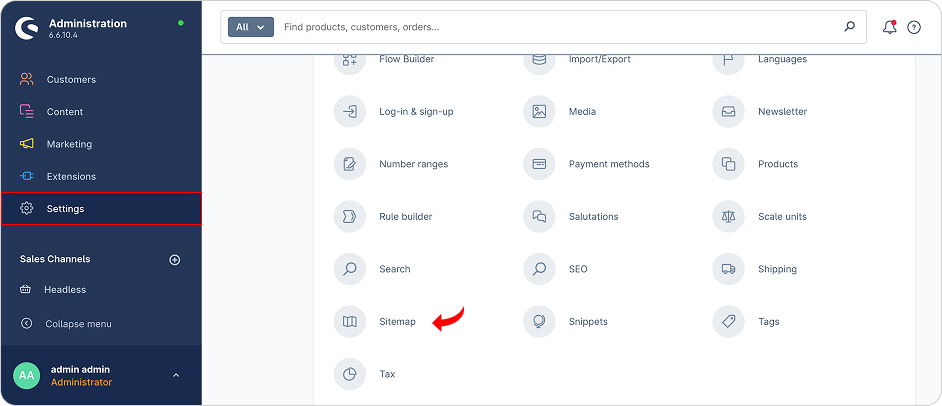
Sitemap Generation in Shopware: Shopware automatically generates a sitemap.xml for your store, which is a file listing all important pages (products, categories, etc.) that search engines should know about. To configure it, go to Settings > Shop > Sitemap in the admin. You’ll find options for how the sitemap is refreshed:
Scheduled: This option will regenerate the sitemap at regular intervals automatically (in the background via Shopware’s scheduled tasks). This is usually a good choice for live shops, as it keeps the sitemap up-to-date without manual effort.
Live: This setting will update the sitemap “on the fly” after a certain refresh time has elapsed. Essentially, if a sitemap exists, it will recreate it after X hours whenever someone (like a search bot) requests it and it’s stale. This is also a fine choice if you frequently add products and want them to appear in the sitemap relatively quickly.
Manual: You can disable automatic generation and choose to generate the sitemap manually. In this case, you’d run a command line task (or rely on the system generating on first request). For most store owners (especially if you’re not a developer), manual is not recommended you’d prefer scheduled or live so you don’t have to worry about it.
Set a Refresh Strategy: Choose either scheduled or live based on your needs (scheduled is generally safe). You can also set the “Refresh time” interval (for example, every 24 hours or so). Once configured, click Save. Shopware will handle generating the sitemap.xml file accordingly.
Locate Your Sitemap: By default, your sitemap index file will be accessible at https://your-domain.com/sitemap.xml . You can verify this by visiting that URL in your browser after you’ve saved your sitemap settings. The sitemap may be split into multiple files (e.g., sitemap_part1.xml, sitemap_products.xml, etc.) if you have a lot of URLs, but the main sitemap.xml will reference all of them. This is normal and helps search engines load your sitemap efficiently.
Submit to Google Search Console: Now that your sitemap exists, you want to let Google (and other search engines) know about it. If you haven’t already, set up Google Search Console for your website (it’s a free tool from Google for website owners). In Search Console, you can add your sitemap URL (just “sitemap.xml” since Google knows your domain once verified). This will cue Google to fetch the sitemap and start crawling the listed pages. Having a sitemap submitted helps ensure new products or pages on your Shopware store get discovered faster.
Bing and Other Engines: Similarly, you might want to submit your sitemap to Bing Webmaster Tools if you cater to Bing/Yahoo users. However, note that by submitting to Google and by simply having the sitemap accessible, many search engines will find it eventually (some even discover it automatically if you mention it in your robots.txt ). Speaking of which:
Robots.txt Check: Shopware comes with a default robots.txt file (located at /robots.txt on your domain) that instructs search engine crawlers about which URLs to crawl or avoid. Typically, it disallows the admin panel and perhaps some dynamic or irrelevant pages, which is good. You may want to ensure that it’s not disallowing anything important. Usually, you won’t need to edit this file unless you have specific sections of the site you want to hide from search engines. If you do need to edit it, you can do so by accessing the file on your server (under the /public directory of your Shopware installation). For example, you might add a line to include your sitemap URL: Sitemap: https://your-domain.com/sitemap.xml (though search engines can find it without this, it’s a nice extra hint). Since there is no built-in admin UI for editing robots.txt in Shopware, you would manually update it via FTP or command line if needed. Many small stores won’t need to touch this at all, but it’s good to know you have control if required.
Ensure Indexing is Allowed: By default, your Shopware store pages are indexable (meaning they don’t have a noindex tag or anything that would block search engines). Just double-check that you haven’t accidentally left your site in a “maintenance” or “preview” mode that blocks indexing. One common oversight is when a site is migrated from a staging environment to production sometimes a noindex setting might be carried over. In Shopware’s case, there isn’t a simple “discourage search engines” checkbox like in some CMS, but if you used a maintenance plugin or custom header for staging, make sure it’s removed on live. You can inspect your page source (Ctrl+U in your browser on a page) and look for if you find that on pages that should be public, remove whatever is adding it. Generally, though, if you didn’t explicitly set that up, Shopware will allow indexing of all normal pages.
Monitor Indexing Status: After doing all the above, give search engines some time to crawl your site. In Google Search Console, monitor the Coverage report to see which pages have been indexed or if there are any crawl errors. If you spot errors (like 404 pages or pages excluded by robots), you can take action: for example, fix broken links or adjust the robots.txt if it’s over-blocking. The goal is to have all your key pages indexed (products, categories, and content pages) so they can appear in search results.
By leveraging the sitemap functionality in Shopware, you make it straightforward for search engine bots to find every corner of your site. A fresh and complete sitemap is like giving Google a map of your store extremely useful, especially for new stores or when you add a lot of new products at once. Coupled with proper indexing settings and not blocking crawlers, this ensures your SEO optimizations on the site can actually be seen and evaluated by search engines.
Pro Tip: If your target market is primarily U.S.-based and you’re only selling in one language (English), you don’t need to worry about multi-language SEO settings. However, if you ever expand to international audiences or add languages, Shopware has built in support for hreflang tags (which tell Google about alternate language versions of pages). You can enable hreflang in your Sales Channel settings by toggling “Enable Hreflang” and configuring multiple domains or locale specific paths for different languages. This is more of an advanced topic, but it’s good to know that Shopware can handle it natively if needed. For now, a single-language US store can focus on the basics we’ve covered above.
By now, you have set up the fundamental SEO features of Shopware: you’ve optimized meta titles and descriptions for a compelling search presence, cleaned up your URLs, added alt texts to your images, structured your on-page content, and ensured search engines can index your site via a sitemap. These steps establish a strong foundation for your Shopware store’s SEO. Remember that SEO is not a one-time task but an ongoing process. Here are a few final tips to keep in mind as you continue on your SEO journey:
Monitor Your Performance: Use tools like Google Search Console and Google Analytics to track how your store is performing in organic search. Search Console will show you which queries bring up your site, how often users click, and if there are any indexing issues. This data is invaluable for refining your SEO strategy over time.
Keep Content Fresh and Relevant: Continuously update your product descriptions, add new blog posts or guides (if you have a content section), and keep your information up to date. Fresh content can attract new visitors and give search engines more reasons to crawl your site. Even updating a category description seasonally (e.g., highlighting winter collection vs. summer collection) can be beneficial.
Mind Site Speed and Mobile-Friendliness: Ensure your Shopware store is fast and mobile-optimized. A fast-loading, mobile-friendly site not only pleases users (especially important for U.S. shoppers on mobile devices) but also gets rewarded by search engines in rankings. Shopware is built on modern technology and responsive design, but make use of caching and a good hosting environment to get the best performance.
Avoid Black-Hat Tactics: Focus on the genuine improvements we discussed. It might be tempting to cram keywords or use sneaky tactics, but modern search engine algorithms are very smart and user-focused. Provide value to your customers, and the rankings will follow. For instance, rather than repeating “Shopware shoes store” all over (which we’ve cleverly internally linked as per our own SEO strategy), concentrate on content quality and relevance.
Use Shopware’s Strengths: Shopware as a platform is SEO-friendly and continuously improving. Keep your Shopware version up to date so you benefit from the latest features or fixes (for example, improvements in SEO defaults, new integrations, etc.). Also explore the Shopware community and forums; since Shopware is popular globally, many developers and store owners share tips that can enhance your SEO configuration further (all achievable with built-in tools or slight customizations).
By treating SEO as an integral part of your store management routine, your Shopware store will be well-positioned to climb the search rankings. Implement the best practices outlined in this guide, stay patient (SEO results take time but are worth the effort), and keep learning about your customers’ search behavior. With a solid platform like Shopware and the right optimization approach, you have all the tools you need to drive organic traffic and achieve long-term success in the U.S. market and beyond. Happy optimizing!